Posts

Painter Sandy Springs Exterior House

Fall House Painting Specials

Is that football I hear?

Yes it is!  And football means that Fall is here.

We didn’t have a typical Atlanta summer this year.  It was one of the coolest and rainiest summers in recorded history.  It was good for interior painting, however, many Atlanta residents postponed their exterior painting projects due to the constant rain.  I’m not a weatherman, but I’m right about the weather about the same percent of the time and I hope that we have an unseasonably dry and warm Fall.

Typically, Fall is good season for exterior painting.  The lower temperature and relative humidity allow the paint to dry at near perfect conditions (manufacturers rate most coatings at around 70 degrees at 60% humidity).  Also, there is no pollen or surprise thunder showers like in Spring and Summer.

GreenWave Solutions is offering 15% off exterior house painting in Atlanta to help our neighbors that didn’t get to take advantage of our Summer specials.

Our 15% off Fall house painting special includes:

  • Exterior Painting

  • Interior Painting

  • Deck Staining and Sealing

  • House Painting

  • Cabinet Finishing

  • Wallpaper Removal

  • Popcorn Ceiling Texture Removal

  • Stipple Texture Ceiling Smoothing

These are only some of the many services that our skilled painters, carpenters and craftsmen do to make your home a more beautiful place.

Call us today to learn more about GreenWave Solutions’ services and specials.  Our professional interior and exterior painters serve Atlanta, Alpharetta, Roswell, Brookhaven, Dunwoody, Sandy Springs, Buckhead, Midtown, Grant Park, Inman Park, Decatur, Chamblee and other affluent Metro Atlanta suburbs.

Call GreenWave Solutions for your free estimate at 404-549-7776

Interior painters, painting, Atlanta, Alpharetta, Roswell, Sandy Springs, Brookhaven, Buckhead, Chamblee, Decatur

Sherwin Williams Eminence Review

As a high end painting company in Atlanta, we like to use the best quality paints and coatings on our projects.  Part of using the best products is always trying and testing new products.  Sherwin Williams helps this process by giving us demo products to use and provide professional feedback.

Today, we are reviewing Sherwin Williams’ Eminence.  Eminence is a high performance, interior ceiling paint.

We used to use ProMar 200 flat on ceilings until recently, when the 0-VOC reformulation rendered a flat with high angular sheen.  Having any sheen associated with your ceiling is asking for trouble due to the typically mediocre drywall work on ceiling.

Choosing the “right” ceiling paint can be challenging.  You don’t need any durability because ceilings get no traffic.  Your first instinct is “get the cheapest flat paint they have.”  This can cause problems because the cheap paints look cheap and have an ugly finish.

So what do you do?

Use Eminence.

The Upside:

Eminence is an acrylic latex paint which gives it low-VOC and water clean up properties.  It comes in a clean, bright white.  Eminence is a thick, sticky paint that prevents it from misting paint all over the painter and floor.

Upon drying, Eminence reveals an exceptionally smooth and flat finish.  This finish does a fantastic job hiding tapes lines and other substrate imperfections common with ceilings.

The Downside:

Eminence’s only drawback is it’s perceived cost.  We painters are used to getting our ceiling paint cheap; like $10/gallon. When you pay nearly $30/gallon for ceiling paint, it is tough to swallow.  However, the finished product speaks for itself so I guess we must revert to the old adage, “you get what you pay for.”

The Verdict for Eminence high performance ceiling paint is…Awesome!

I love this product, my painters love this product, and most importantly, my clients love this product.  Eminence’s ease of application and outstanding performance makes it worth the extra money it costs.  Hopefully, Sherwin Williams will give us some special pricing after reading how much GreenWave Solutions loves their Eminence coating.

Right, Johnny? 😉

Connect with  on Google+

GreenWave Solutions is the best painting contractor in Atlanta.  Our painters perform high-quality painting and drywall work in Alpharetta, Sandy Springs, Roswell, Buckhead, Chamblee, Decatur, Doraville, Milton, John’s Creek, Dunwoody, Grant Park, Virginia Highlands, Smyrna, Vinings, Marietta and many other metro Atlanta cities.

Call us about our house painting specials!


House Painting, Painters in Atlanta, Alpharetta, Chamblee, Dunwoody, Roswell, Buckhead, Sandy Springs

What are VOCs in Paints?

Intelligent people agree that global warming is real.  While its exact causes are unknown, scientists say that greenhouse gases are contributing to it.  Whether or not greenhouse gases are causing global warming, we can all agree that they are bad for us to breathe.  The chief cause of greenhouse gases are volatile organic compounds (VOC).

These compounds are organic chemicals with low boiling points.  Because of the low boiling temperatures, these chemicals convert into a gaseous state in normal conditions.  They typically are toxic and flammable.

Here is an everyday example of what this means.  Water has 3 states; solid, liquid, and gas (please don’t comment about plasma).  Water is solid at 0 C and below, liquid between 0-100 C, and gas at 100 C and above.

Instead of water, let’s look at toluene.

Instead of the vapor pressure of 100 C, toluene’s is 25 C.  This is cooler than room temperature.  Because of this a bucket of toluene will emit vapors in cool temperatures.  Unlike water, these vapors are toxic to humans, animals, plants, and the ozone layer.  Toluene is a solvent common to many industrial coatings and epoxies.

Why are the VOCs in paint?

Paints contain VOCs because of the chemicals that act as the paints solvent.  Solvents keep paint in liquid form until you use it.  That is why paint smells while it is drying and then stops smelling.  The fumes come from the solvents leaving the paint.

The reason that so many paints use toxic solvents is because that is all that technology had allowed for a long time.  Paints that used water as a solvent, like acrylics and latex, were not so durable as paints that used MEK, lacquer, and stronger chemicals as solvents.  This is just one of those “life isn’t fair” things like “why is the most delicious food the least healthy?”  God has a twisted sense of humor, I guess.

The good news is that scientific advances have made acrylic resins compete as good as their more toxic counterparts’.  By replacing the resin package, scientists are able to make awesome paints that use water as the solvent.  That is how paint manufacturers develop “0-VOC” paints that perform better than VOC heavy coatings.

Thanks science!

By

President of GreenWave Solutions, Atlanta’s first and best green painting company.  GreenWave Solutions offers the best painter services in Alpharetta, Atlanta, Dunwoody, Sandy Springs, Roswell, Brookhaven, Duluth, Grant Park, Inman Park, Buckhead, Midtown, and many more!

Atlanta Wallpaper Removal, Roswell, Alpharetta, Decatur, Sandy Springs, Buckhead, Chamblee

How to Remove Wallpaper

We are going to tackle one of the most tedious and annoying jobs for do-it-yourselfers – wallpaper removal.

Anyone who has removed wallpaper knows that it is a horrible experience.  The scraping is horrible enough, but after it is done, you are left with dirty damaged drywall.  Then you learn that refinishing walls is harder than it looks on HGTV.  After that you get to have fun priming and painting.  I can’t tell you that there is secret to make wallpaper removal easy, but I will tell how professional painters do it.  Here we go.

1. Gather all you materials.  This is list of almost everything you need (there may be other items that I take for granted because I see this all the time.  Please don’t send me hate mail if I forgot something).

  • a steamer
  • scrapers
  • construction paper and plastic
  • painters tape
  • sponges and rags
  • wallpaper removal gel or solution (optional)
  • powder drywall joint compound, “mud” (45 minute)
  • mud pans
  • finishing knives
  • paint brushes
  • rollers, frames, pole
  • sand paper and pole sander
  • dust masks and eye protection
  • alkyd or shellac based primer
  • paint

2. Prepare your work area.  Cover floors with the construction paper.  Try and close off the area using the plastic.  This is for keeping the dust contained.  Remember to close any intake ducts or turn off HVAC.  Take off switch plates, electrical outlet covers, and anything else that’s in way.  This process is annoying, but you will be glad you did it at the end.  It controls dust and makes clean up MUCH easier.  Trust me.

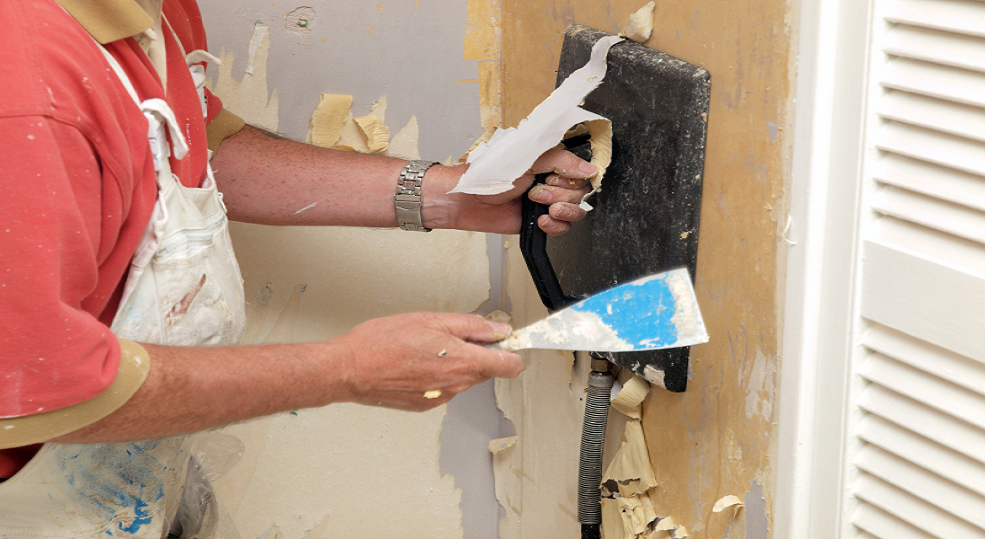
3. Time to start removing the wallpaper.  If you are using wallpaper scorers and gels, follow the manufacturers instructions.  If you have a steamer, start steaming.  I recommend using a scoring tool to make holes in the vinyl layer.  This helps the heat and steam get through the paper for better release.  This can go two ways; either the paper is going to comes off in nice big pieces or small ones.  Pray for the first option.  Use your scraper to get under the paper and GENTLY scrape the paper and adhesive from the wall.  Try your best to avoid gouging holes in the wall.  The more damage you do during the removal, the more difficult refinishing the wall is going to be.  Keep a bucket of warm water and wipe off the wallpaper adhesive while its wet.  This also will facilitate next steps.

4. By now you are ready for a break.  Take a break, eat something, drink a beer and let the walls dry.

5. Refinish the walls.  This can be tricky.  Make sure you mix the drywall compound using the ratio on the bag.  Only mix small amounts at a time.  Using your finishing knives, apply a THIN layer of mud over the areas that have damage or are rough.  The trick here is too use as little finishing compound as necessary to bury imperfections.  Remember the more you put on, the more you are going to have to sand off to achieve a professional finish.  Also, it is much easier to apply a thin 2nd layer coat having to sand down a even a 1/4 inch of excess.  Putting too much joint compound is one of the most common rookie mistakes.  After the mud dries (about 45 min depending on temperature and humidity), sand it down.  I recommend 150-220 grit paper.  Wear a dust mask and even goggles.  It is going to be disgustingly dusty.  That is why we made a barrier with plastic and closed intake vents in step 1.  Drywall dusts really sucks.  I’ve seen projects where people forget to turn on HVAC and the dust gets sucked up and blown through an entire house.  Not cool.

After you have sanded the walls, refinish any areas that need more work.  After everything is dry, take a damp rag or sponge and wipe all of the loose dust from the walls.

6. Take another break.

7. Now that you have smooth, clean walls you are going to prime everything that had wallpaper on it.  I recommend using an alkyd or shellac based primer for this.  Wallpaper adhesive is a water soluble, starch based product.  Using a waterborne primer can sometimes reactivate the glue and cause problems for the paint.  Alkyd and shellac based primers are going to have higher VOCs and typically have bad fumes.  Get fans blowing and open windows because these are bad to breathe.  Use a respirator if you have one.  Keep kids away, too.  They will have plenty of time to damage their brains in college.  The good news is that these products do dry quickly so the fumes dissipate quickly.

8. You’re almost done.  All that’s left is the easy part – painting.  Everything should still be prepared from priming so painting is super easy.  Choose your favorite paint and color and paint.  If you are using a dark color, have the paint store tint your primer so that one coat of paint will cover adequately.

Congratulations!  You have successfully removed and repainted a wallpapered area.  You also learned why so many people opt to call professional painting companies to do this job.  Doing it yourself can save you money, but the hassle and stress may cost you your sanity.

GreenWave Solutions specializes in wallpaper removal.  We remove residential and commercial wall coverings.  Call us to schedule your free estimate today!

GreenWave is also the best interior house painters, exterior house painters, and house painting company and serves Atlanta, Alpharetta, Brookhaven, Buckhead, Chamblee, Doraville, Dunwoody, Grant Park, Inman Park, Johns Creek, Duluth, Milton, Roswell, and most major suburbs.

By: Daniel Macris, President of GreenWave Solutions, the best house painters in Sandy Springs.

Connect with

Atlanta Interior Painting

Interior House Painting Specials for Autumn

Autumn is here and the cooler weather has come with it.  The shorter days, cooler weather, and Halloween decorations mean its time to get ready for the holidays!

GreenWave Solutions wants to make sure your home looks its best for the holiday parties and family gatherings.  Whether you want a brand new color scheme or just a freshening up, we have everything you need.  We offer color consultations to help you choose the perfect color scheme for your home.  Our professional painters specialize in using the new, low and zero VOC paints that don’t release toxic fumes and look beautiful!  We take the extra steps to ensure that your home, floors, and furniture are protected during painting.

We are having our annual Autumn specials.  GreenWave Solutions is now offering 15% off interior house painting services.

If your interior looks good, but your exterior needs some TLC, we also offer 15% exterior house painting for a limited time.  Call and schedule your free estimate today!

Connect with

Atlanta Residential Interior Painting Gallery

Which Paint Sheen to Choose?

As a painting contractor, I am constantly asked by my clients which paint sheen is best. This is one of those questions that doesn’t have a single, correct answer.  Every sheen has pros and cons associated with it.  For this article I am focusing specifically on interior, residential applications.

Before you can decide what the best sheen is, you must understand environment in which the coating is exposed.

Here are the factors that you must consider when choosing a sheen:

1.  How much wear and tear will the coating be exposed to? Are their pets or children that frequently and/or roughly touch the walls?  Is it a high traffic area like an entry way or mud room?  Will the area be exposed to abnormal conditions like steam, smoke , or grease?  If the walls are going to get a lot of wear and tear or will require cleaning, you will need something with a sheen.  Paints with sheen are more durable and washable.  Some manufacturers have “washable flats.”  These coats have outstanding durability with a very slight sheen.  Most of them are as good as advertised.  They are, however, expensive.

2.  In what condition are the walls? Do the walls have bad repair work done?  Are there nail pops?  Is the drywall hung and finished poorly?  If you answered yes to any of these, you should opt for a flatter sheen paint.  The flatter the sheen, the fewer imperfection you will see.  This is because light bounces off of imperfections at odd angles and if you have a sheen, you will see a glare at the imperfection.

How dark is the color? Darker colors tend to be unforgiving when showing lap marks and surface imperfections.  Paints with higher sheen have these same limitations.  That is why I don’t recommend using higher sheen paints for dark colors.  (I am referring to walls with this statement.  In some applications, this is not true).  This isn’t a rule, but my expert recommendation is “the darker the color, the flatter the sheen.”


Well that’s about it.  I’m sure we can think of other factors that can influence paint sheen, but the three above cover 95% of all interior, residential projects.


To sum up

Flatter sheen paints:

Pros – Better at hiding imperfections, touching up, give walls a softer, smoother look.

Cons – Mar and scuff easily,  not washable, tend to fade faster

Higher sheen paints:

Pros – Durable, washable, holds sheen and color

Cons – Show imperfections, laps marks, and glare


By Daniel Macris

Daniel Macris is the president of GreenWave Solutions, Inc. in Atlanta, GA.  GreenWave Solutions is the premier painter in Atlanta.  We are the first “Green” contractor in Atlanta.

Connect with

Atlanta Faux Painting & Finishing

Faux Finishes


Atlanta Faux Painting &amp FinishingFaux finishes in painting allow the person to create textures or effects that resemble surfaces such as stone, suede, crackled paint, etc., that enhance the appearance of the room. There are hundreds of faux finishes that can be selected from, depending on the design style that you want to achieve in your home.

Some of the most popular faux finishes include rag rolling, stippling, and stone finishes. Each of these faux finish techniques can be accomplished with your imagination and just a few materials.

For stone faux finishes start by making sure that the surface you are applying the faux finish technique to is clean, dry and free of any debris. It is a good idea to get a picture of the type of stone, (including colors and patterns) that you want in advance so that you have a reference while you work. Next you will need to apply a base coat in an off white color for the foundation of the faux finish . Once this dries, mix together the primary color of your stones, using a latex paint, with two parts of a latex glaze. This faux finish will now need you to use a rag or paper as an applicator to dab on the mixture to create the texture of your “stone”. Then, using cardboard or heavy paper, create a stencil for your “stones” and trace them onto the surface, taking care with placement of the “stone” so that they seem natural to the eye. Finally, your faux finish will need you to follow the lines of the outside of the stones with a natural color paint, creating the appearance of a mortar on the surface. While this faux finish technique may take some time, depending on the area to be covered, the results will create a beautiful faux stone finish that enhances any decor.

As with any faux finish technique it is advisable to first practice the technique process on a spare board or surface that can be discarded when you are done. Not only will the practice time make sure that you are comfortable with the real application of the faux finish , it will allow you to make any adjustments in color if necessary before you begin the work.


Atlanta Popcorn Ceiling Removal

Paint Your Ceiling to Give Your Room a Brand New Look!


Ceiling Painter AtlantaWhen you decide to paint the interior of your house the first things that come to mind are the colors you want to paint your walls and how will you can make the walls look decorative and make the rooms in your house look more attractive BUT, do you ever give any thought to painting the ceiling?  Well, painting your ceiling may sound odd, but by doing so you can make the room look and feel different and stylish.  Painting your ceiling can change the entire look of your house.

Ceiling painting can magically transform the room and tie together the color palette, plus it makes decorating even easier.  For example:  If a room has high ceilings then a darker color paint can make the room look warm and cozy, because,  if you want the room look larger you can paint the ceiling with a lighter color.  Remember, it is not necessary that you paint your ceiling according to the color of the walls, though it can definitely make a room feel larger or smaller and add an element of style and flow to the entire house.

As you decorate and paint each room of your house, you should really pay attention to your ceilings. Remember to follow these important rules when you decide to paint your ceilings:

  • Before beginning to paint the ceiling, it is very important to clean it with soap and warm water.  Dust in your house can accumulate on your ceiling, especially if you have ceiling fans or AC ducts con the ceiling.  Ceiling tiles should be cleaned with a mixture of bleach and water.  Properly cleaning your ceiling prior to painting is imperative so that the paint can be coated smoothly and evenly.


  • Before using paint on the ceiling it is important, as with painting any surface, to properly apply a coat of primer to the ceiling. Applying a coat of primer to your ceiling will make sure that your coating of paint will dry properly, smoothly, and evenly.


  • It is always better to stay consistent while you are painting. For the best results always brush or roll in the same direction so the paint will coat evenly on the ceiling.


  • Before you actually begin painting the ceiling it is very important to have these important items handy:  Latex primer, paint, a bucket and/or roller tray, paint roller, bleach, spray bottle, water, rags, newspapers and/or a drop cloth.  These are the essential tools to have when beginning to paint. It is also a good idea to have a drop cloth that can cover the entire surface area of the floor in the room whose ceiling you wish to paint.


  • With regards to the color you should use to paint the ceiling take into account the color of the walls, furniture and decorations, check out a variety of color palettes and do some “test runs” by painting small areas of the ceiling where it adjoins the wall.  Most of all USE YOUR IMAGINATION to make your room look unique!

Connect with